
22 percent Biochar from Feedstock iCan

Below are a few photos of a novel, at least to me, use of draft deflectors in
combination with a secondary air gap and a mixing chamber above the feedstock,
but below the secondary air gap.
This design is typically yielding abut 22% of the feedstock's weight as biochar.
Passes all of the usual simple tests. Run times in the larger tuna fish cans are in the
42 minute range with 500 grams of soft wood pellet feedstock. I load the bottom
can, of the feedstock chamber, to only about 50% of capacity. This leaves the top
half of the can as a mixing chamber into which the draft is deflected. This creates
thorough mixing of the combustible gases with the secondary air. The result is very
clean stack gas. I wish the many small diesels out there burned nearly as cleanly.
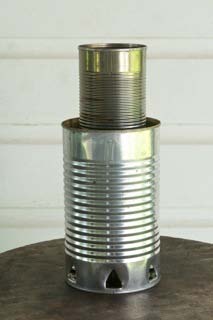
Student set up using two 15 oz cans and a larger outer can for safety and to protect
the fire from wind gusts.
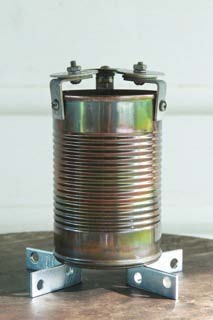
Outer can removed. The secondary air gap is about 1.2 cm
I have varied the size of the gap. The larger the gap, the weaker the draft on the primary air and the more the syngas is cooled, the longer to cook or boil water. If the gap is too small, the primary air draft is stronger, but the syngas does not have enough secondary air for a good fuel/air mixture. It's a Goldilocks thing, too big, too smal, or just about right. The gap will vary with can diameter and feedstock type and condition as well. I doubt very much that it is a fixed dimension.
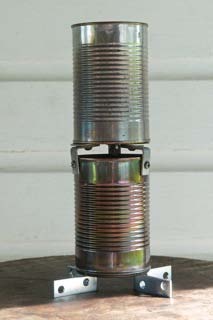
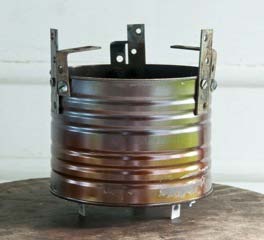
The three brackets accomplish these functions:
1. Create the secondary air gap;
2. A platform for the top can, which has had both its top and bottom removed and no
other modifications;
3. An attachment point for the three draft deflectors.
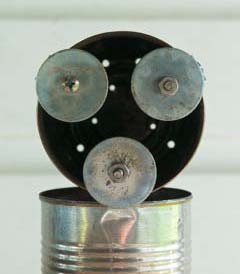
the three 3 cm washers used to create draft deflection back into the
mixing chamber in the top half of the bottom can.
[RWL: These are most interesting. What was the initial motivation for their size and shape?]
I realized the arms of the brackets, in the small can, were essentially forming a weak concentrator effect. So I added some handy washers to enhance the effect. I was surprised at how very well indeed this approach worked. Watching the flames looks very much as they are deflected back into the "mixing chamber" in the top half of the feedstock can. Note: this design works even when the feedstock can is 75% filled.
Note, unlike many concentrator rings, usually below the secondary air supply, the
negative space created by the deflectors is not circular. Further, the deflectors are
above the secondary air slot. The resulting flame patterns and colors have to seen to
be appreciated. There is sufficient turbulence most of the time that you can actually
hear the noise it makes.
The hole pattern for the primary air is an outer ring of ten (10) 1/8th inch holes and an
inner ring of five (5) 3/32 inch holes.
Run time is relatively long for 130 grams of wood pellets, but yields good results.
Enlarging the inner ring of holes to 7/64th would speed things up.
This approach also works for larger cans, such as 4 lbs Tuna fish cans or 3 lbs
Costco coffee cans.
They have the same diameter: ~25.5 CM
This shows a 4 lbs tuna fish can used as the feedstock can, or the bottom can,
standing on its three small angle brackets. The primary air gap is about 2 cm.
The top brackets create the secondary air gap, support the draft can, and act as
mounting points for the draft deflectors. The deflector washers have not yet been
installed.
A secondary air gap of about 1.5 CM works well.
The tuna can is about 60% of the height of the Costco coffee can. Height is 11.5 cm. using this gives me an option to create less draft than a taller can. It also more evenly distributes the heat in the container as it is not as close to the cooking surface. The two tuna cans system will get a BGE all the way to 420 degrees. It will hit 350 degrees with about 2 minutes and hold there for about 12 more minutes before the temp rises upwards towards 400.
The simple draft can, both ends removed, is supporting the Feedstock can for this
photo.
In use, the feedstock can will be on the bottom and the draft can will rest on the
bracket arms.
The three deflector washers are 2 inches, or about 5 cm, in diameter.
The primary air holes are as follows:
Outer ring: 18 holes @ 9/64ths of an inch
Middel ring: 10 holes @ 7/64ths of an inch
Inner ring: 3 holes @ 1/8th of an inch and 3 holes @ 7/64ths.
The inner ring is about half way between the center of the can and the middle ring of
holes.
My goal is to create the longest run times that leave no creosote deposits on any of
the outer metal surfaces or in the quenching container. This requires that the primary
air supply be carefully balanced with the defelctors, secondary air gap, and the height
of the draft can. If you have some creosote, its location indicates "cold spots" in the
system.
Both cans are four lbs tuna fish cans I dumpster dive for. Cost: $0.00
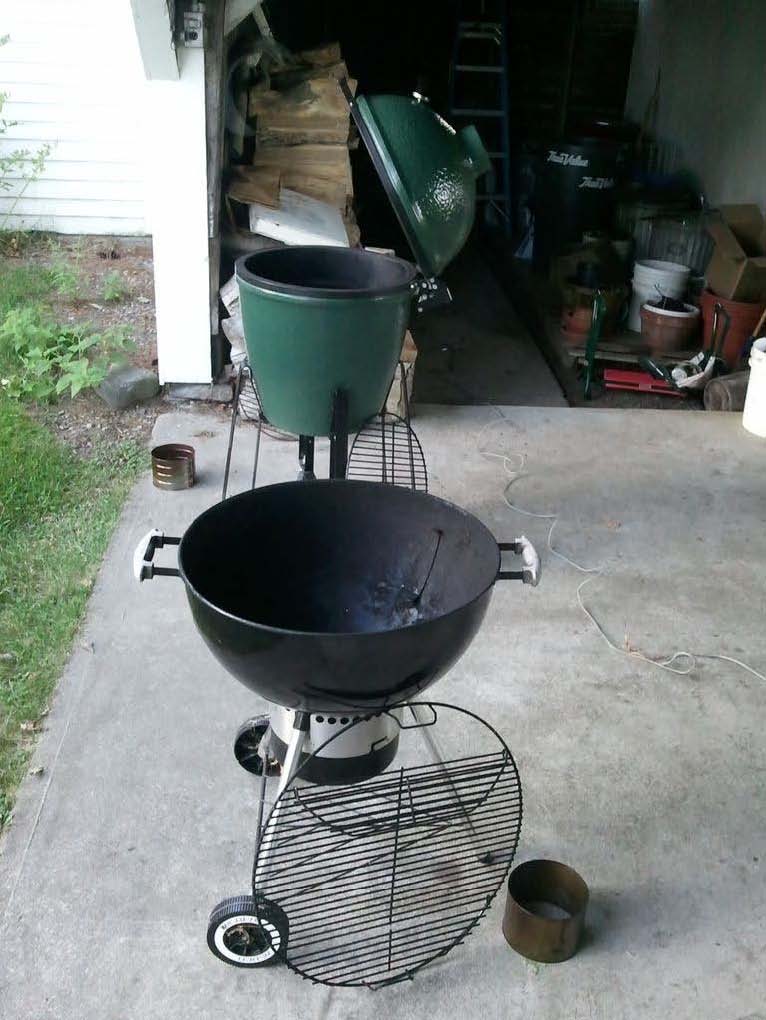
This two can configuration works well when placed either in the bottom of a Big
Green Egg or in the ash bucket of a kettle style grill. Note: you will have to have an
8" diameter hole cut in the bottom of the grill chamber to allow the cans to rise up into
the cooking chamber. Used in a common kettle grill, you will notice that the
secondary air gap lines up nicely with the ring of air holes around the top of the ash
bucket of the grill.
When used in a kettle type grill, the air inside the grill will reach 440 degrees F.
My secondary air gap conveniently aligns with this ring of air supply holes.
When used in a BGE or kettle grill, the cans will below the grills. This allows you to
cook food over indirect heat or direct. In either case, you will be cooking over "real
wood", not charcoal. You will be making charcoal, not burning it!
As you will not be touching the TLUDs below the grills, you can stir thing vigorously.
For longer cooking times I use 750 grams of wood pellets. At the end, I will have
created enough biochar, usually about 22% of the weight of the feedstock, to have
removed a pound of CO2 from the atmosphere -- if I sequester the carbon properly in
my fields and gardens.
Lastly, these pictures and notes are only meant to suggest departure points for your
own experiments.
I look forward to your comments and suggestions.
Jock
[RWL: Can you describe more about your "quenching."
I now do a multi step quench.
Weigh can as it comes out of the grill.
Pour the charcoal into a clean metal bucket. Cover
Weight the empty fuel can. The delta = charcoal harvest
Check bucket after a few minutes to see if the smoking Biochar has deposited any creosote on the inside walls. The goal is vanishiingly small amounts of creosote deposited.
Now I have two options:
1. Pour hot charcoal into a mason jar and seal. This gives me bone dry charcoal in a few hours.
2. Pour the hot coals into a clean can and cover slowly with water from a height so as not to get burned by the live steam. I use a second container for this so as not to pick up any creosote that might be in the first bucket. I want to smell the charcoal, not any creosote deposited in the first can. This gives my absolutely safe, water saturated charcoal. Eliminates fire risks and burn risks. Important when teaching other people of all ages.
The water quench also allows me to check for floaters and ash content. You do not want milky quench water. I take the bucket of biochar and water inside, pour it into a large sieve, collect the water mixed with charcoal dust to use to water plants, and then dump the drained biochar into a bucket. I use a lot of this in my kitchen compost pail -- liberally cover the bottom of a rinsed out pail before adding more scraps. Add more biochar as the pail fills. Odor control and pre-mixes compost and biochar before I take it to the compost pile.